FAQs
School Payment Portal FAQ for Parents and Guardians
Trying to make a payment for your student? See the guide below for help with some common questions.
Vanco's RevTrak Web Store
-
It may be linked from your district website, or you may be able to find it via your search engine by searching your district name + RevTrak. If you cannot locate your district store, please contact your district.
-
Click ‘Log In’ in the navigation bar. Under the password field, click ‘Forgot Password’ and enter the email address associated with your Web Store account. If valid, a password reset link will be sent to the provided email.
-
Visit your district’s online Web Store and add all the items you want to purchase to your shopping cart. When you are ready to check out, click ‘Checkout.’ You may need to log in or create your personal Web Store account. If you wish to pay via eCheck, enter your billing information and select ‘Add eCheck.’ If you wish to pay with a credit or debit card, select ‘Use Debit/Credit’ enter your billing and payment information, and then select "Add Card". Verify your information is correct and when ready, click ‘Place Order.’ The payment will be processed, and the receipt can be viewed/printed. A receipt will automatically be sent to the email address provided. Receipt can be viewed at any time through your account settings.
-
You may enter a new payment method during checkout. To do so, see response to "How do I make an online payment?". You may also manage payment methods through user settings. To access user settings, hover over 'My Account' on the top menu bar within your school's RevTrak Web Store and select menu option 'My Settings.' Within 'My Settings', you may view or delete stored payment methods or add new payment methods by selecting 'Add eCheck' or 'Add Debit/Credit Card' and completing the necessary payment details on the forms.
-
A refund takes 3-5 business days. If you do not see the refund after 5 business days, please get in touch with your school or district. Only your school or district is authorized to assist with refunds.
-
Try these troubleshooting strategies first:
- Are you sure you are attempting to log into RevTrak? Often RevTrak integrates with a school’s SIS (ex: PowerSchool or Skyward). Make sure you are using the correct login portal. You should see ‘RevTrak’ somewhere in the URL.
- If you can confirm you are logging into RevTrak, try resetting your password.
- If you cannot log into your RevTrak account after resetting your password, get in touch with your school or district. Only your school or district is authorized to assist with password changes.
-
Auto-replenish settings can be adjusted at any time through My Account or the food item.
- Log in to the Web Store account.
- Click ‘My Account’, then ‘My Settings.’
- In the left column, under ‘Linked Accounts,’ click the account to manage.
- Next to ‘Auto-Replenish,’ toggle the slider so the label states ‘Disabled.’ These same features can be accessed through the food item.
- Click ‘Save.’
-
Ask the previous school for the refund. Refunds take 3-5 business days to process. If you do not see your refund after 5 business days, get in touch with the school or district. Only the school or district is authorized to assist with refunds.
-
No, you cannot transfer funds from the previous school district to the new school district, even if they are using Vanco’s RevTrak Web Store . You will need to ask the previous school district for a refund and then move those funds to the new district.
-
To request a refund, get in touch with your school administration. Only the school or district is authorized to assist with refunds.
For all other questions, please contact your school or district.
Food Service Solutions/MySchoolAccount
-
1 - Go to https://www.myschoolaccount.com and click Create Account at the top right of the homepage.
2 - Enter your personal information required on the Parent Account Sign-Up page. Click Next when finished.
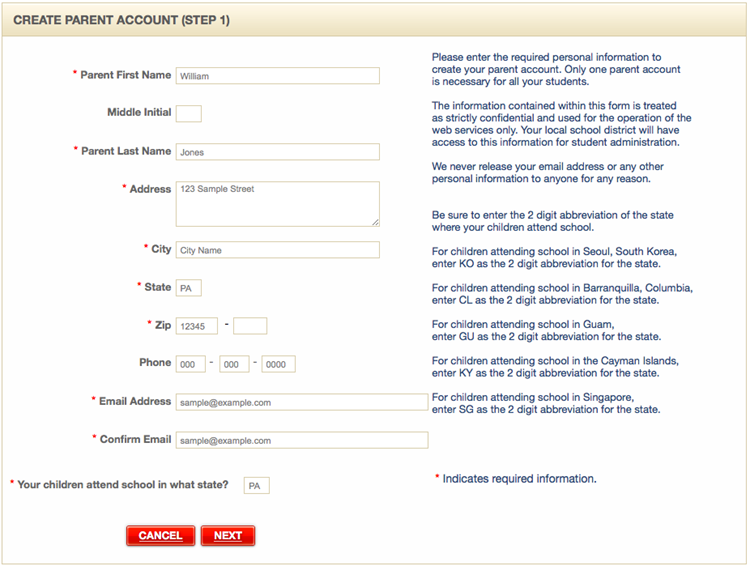
3 - Create a User ID and Password. Please make a record of your login ID and Password for future use. Click Next when finished.
4 - Select your student's School District from the "School District" drop down menu. Check that you have accepted the terms of the User Agreement and click Next when finished.
-
1 - From the Dashboard, click on Manage Students button.
2 - Click the Add Student button.
3 - Add the pertinent information for your student. You will need your student’s assigned Student ID# which can be attained from your students School/District and in some instances, date of birth.
4 - You can then choose to set your low balance notification alert minimum balance by adding a total and checking the Send low balance notification check box.
5 - Click ADD and your student will appear in your account when you go to the dashboard.
Repeat this process if you have multiple students
-
1 - From the Dashboard, click on the Manage My Account button on the top right of the page.
2 - Find the Login Information box (Shown below).

3 - Enter your Current Email.
4 - Enter your new desired email in the New Email and Confirm Email boxes.
5 - Click the Save Changes button.
-
1 - From the Dashboard, click on the Manage My Account button.
2 - Find the Login Information box at the top potion of the page (see below).

3 - Enter your Current Password.
4 - Enter your new desired password in the New Password and Confirm Password boxes.
5 - Click Save Changes.
-
Click the Forgot Password? link in the myschoolaccount.com login page. Enter the e-mail address you used when you created your myschoolaccount.com account and click Retrieve Password. Your password will be e-mailed to you.
-
1 - From the Dashboard, click on the Manage My Account button located on the top right of the page.
2 - Find the My Information box (see below).
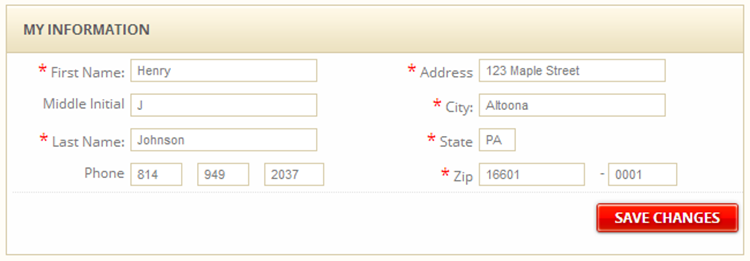
3 - Make any desired changes to your personal information.
4 - Click the Save Changes button to complete the process.
-
1 - From the MySchoolAccount dashboard, click Manage My Account button at the top right of the page.
2 - On the right side of the page, click the gear icon then click Deactivate Account. (See image below)

3 - Fill in a reason for deactivating your account and click Send Request. Your request will be forwarded to the MSA webmaster team for processing.
-
1 - From the Dashboard, click on the Deposit Funds button.
2 - Find the My Students box (shown below).
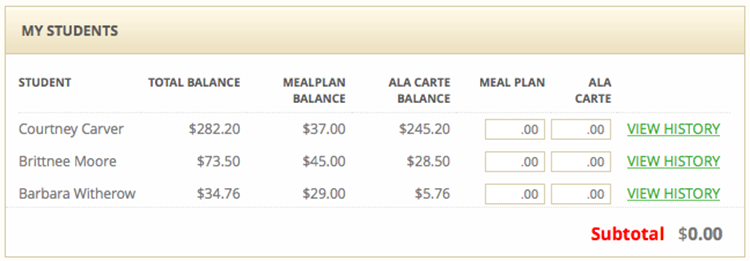
3 - Fill in the amount to deposit in the Meal Plan or Ala Carte field.
4 - Select your payment method and click Make Deposit. (Allowable funding methods are made at the discretion of the School/District)
5 - For first time users, you will be asked to add your billing and payment information. Then click Proceed.
6 - Confirm your order then select your preferred payment method.
7 - Click the Pay Now button.
-
This is typically related to the school using a food service provider such as a caterer. Please double check with their school to be sure what to enter.
-
**Pre-Order is not available at all schools. Check with your school to confirm if you have access to this feature.**
1 - From the dashboard, click on the Pre-Order button. The pre-order page will display (Shown below).
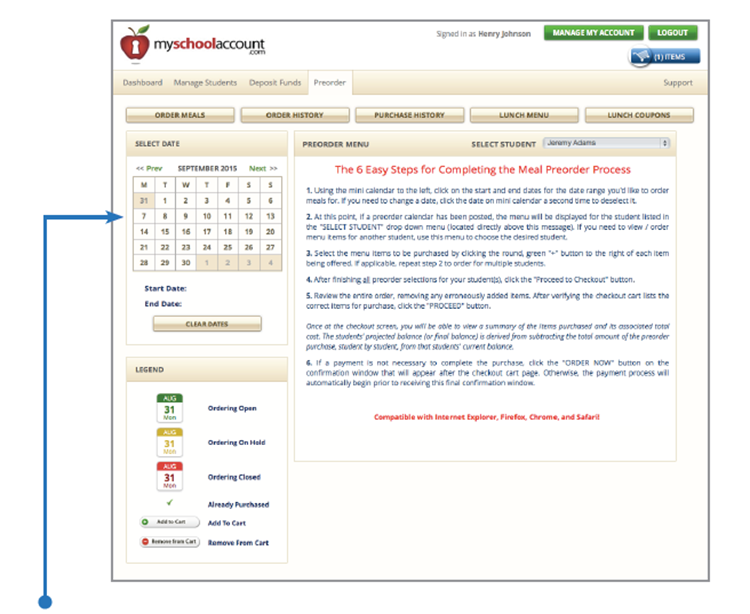
2 - Using the mini calendar to the left, click on the start and end dates for the date range you’d like to order meals for. If you need to change a date, click the date on the mini calendar a second time to deselect it.
3 - At this point, if a pre-order calendar has been posted by the school/district (Shown below), the menu will be displayed for the student listed in the “SELECT STUDENT” drop down menu. If you need to view/order menu items for another student, use this dropdown menu to choose the desired student.
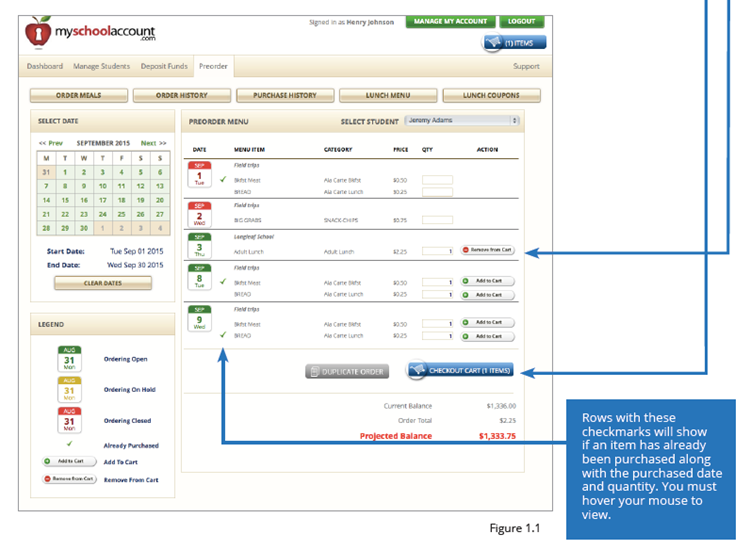
4 - Select the menu items to be purchased by clicking the “Add to Cart” button to the right of each item. You can change the quantity of the item by increasing the number in the quantity (qty) field. If applicable, repeat the steps above to order for multiple students.
5 - To decrease the amount of items ordered or to remove any item, click the “Remove from Cart” button to the right of each item. To adjust an item quantity, type the value in the “qty” box and click “Add to Cart”.
6 - After finishing all preorder selections for your student(s), click the “Checkout Cart” button.
7 - Review the entire order, removing any erroneously added items. After verifying the checkout cart lists the correct items for purchase, click the “NEXT” button.
8 - Once at the “CONFIRM TRANSACTION” screen, you will be able to view a summary of the items purchased and it’s associated total cost. The students’ new balance is derived from subtracting the total amount of the preorder purchase, student by student, from that students’ current balance.
9 - If a payment is not necessary to complete the purchase, click the “FINISH” button. Otherwise, the payment process will automatically begin prior to receiving this final confirmation window.
-
1 - After adding desired items to you cart, click the “Duplicate Order” button located next to the Checkout Cart button near the bottom of the order screen (Shown below).

2 - After you click the “Duplicate Order” button a duplicate order popup will appear (Shown below) The menu items that you have selected for a student can be duplicated for the students that are in the popup window. You can then select the students that you would like to duplicate this order for. If there are no cart item conflicts, select “OK” to complete your duplicated order.
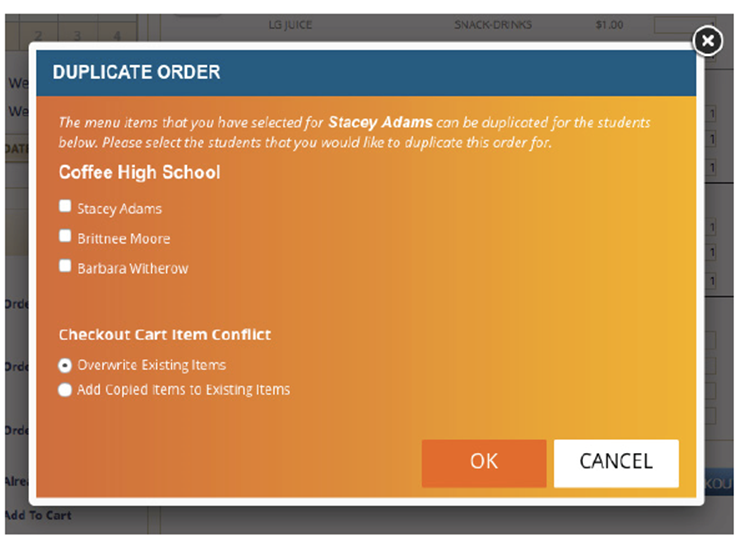
NOTE: If you had previously added items to the cart for the student you are selecting, there will be a cart item conflict. In the popup window you have the option to “Overwrite Existing Items” or “Add Copied Items to Existing Items.” After choosing your option, select “OK” to complete your duplicated order.
-
A Student ID number can be obtained by contacting the students' school. Your child’s ID number may also be displayed on their school ID card.
-
1 - From the Dashboard, click on the Manage Students button.
2 - Select the student you wish to remove by checking the box in front of their name (see image below).
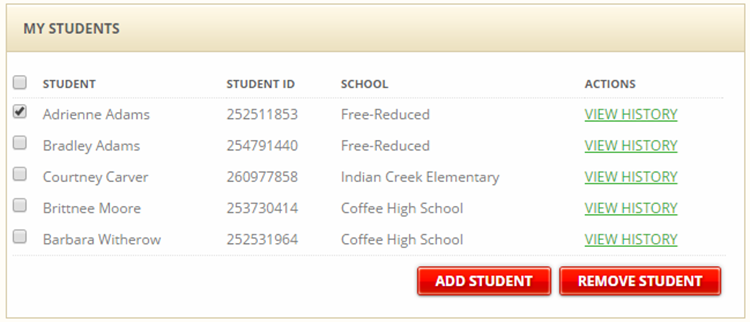
3 - Click the Remove Student button. You will then be prompted to confirm your action.
-
**IMPORTANT NOTE: This feature is not currently available to all schools.**
In order to save bank account or credit card information on myschoolaccount.com, you have two options. You may either enter a bank account or credit card through the Manage My Account section of the site, or you may choose to save your payment information when making a deposit.
Adding a Bank Account or Credit Card Through the Manage My Account Section
1 - From the dashboard, click the Manage My Account button at the top of the page.
2 - Under the Banks and Cards section, click the Add Account button. You can also edit an existing bank account or credit card by clicking the Edit button next to the corresponding account/card. You will see the screen pictured below.
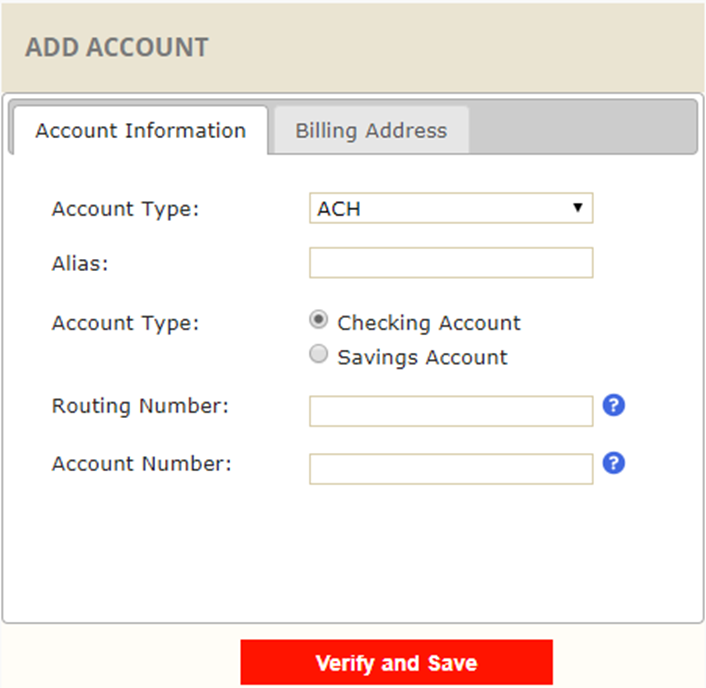
To add a bank account:
1 - Choose the ACH option from the Account Type dropdown menu.
2 - Enter the Alias for the account.
3 - Choose the Account Type (savings or checking).
4 - Enter the Routing Number and Account Number.
5 - Click the Billing Address tab and enter the required information.
6 - When finished, click the Verify and Save button.
To add a credit card:
Choose the Credit Card option from the Account Type dropdown menu.
Enter the Alias for the account.
Enter the First and Last Name, Credit Card Number, CVV, and Expiration Date for the card.
Click the Billing Address tab and enter the address associated with the account.
When finished, click the Verify and Save button.
Saving a Bank Account or Credit Card When Making a Deposit
1 - From the dashboard, click the Deposit Funds button. After entering your payment amount, you will be required to enter your Payment Method. To add a new bank account or credit card, select the appropriate payment method (Checking Account Debit, Savings Account Debit, or Credit Card/Debit Card).
2 - Click the Make Deposit button.
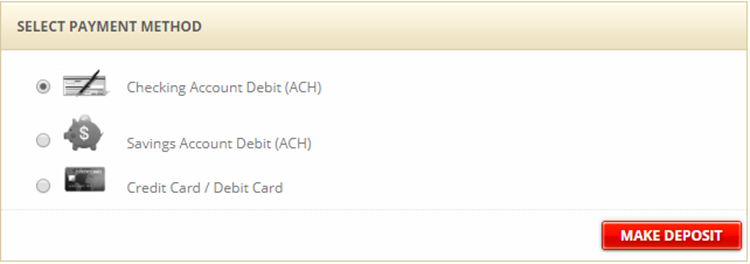
3 - Here, you will enter your Payment Method. Select either Use New ACH Account or Use New Credit Card Account.
4 - Enter the Alias for the account.
5 - Check the Save payment method for future usage box.
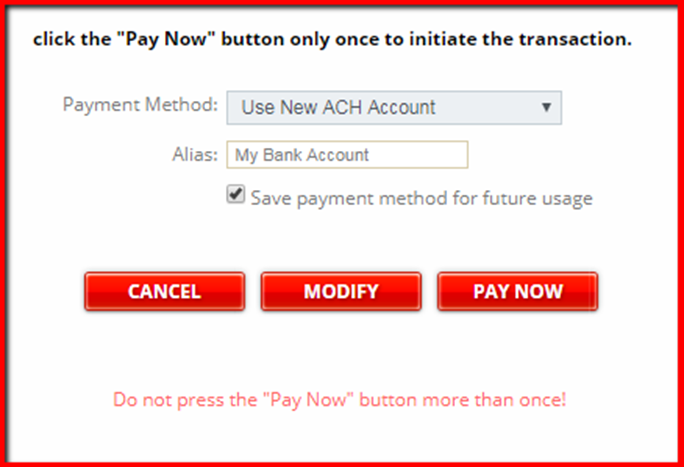
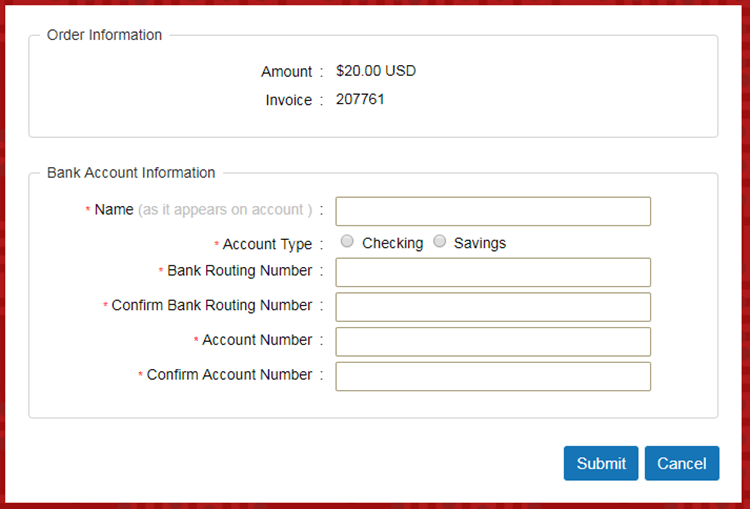
6 - When you click Pay Now, you will be prompted to enter the information for the bank account or credit card. Click the Submit button to finalize the transaction and save the information.
-
1 - From the Dashboard, click on the Manage My Account button on the top right of page.
2 - On the Manage My Account page, find the Notification box at the bottom of the page (shown below).
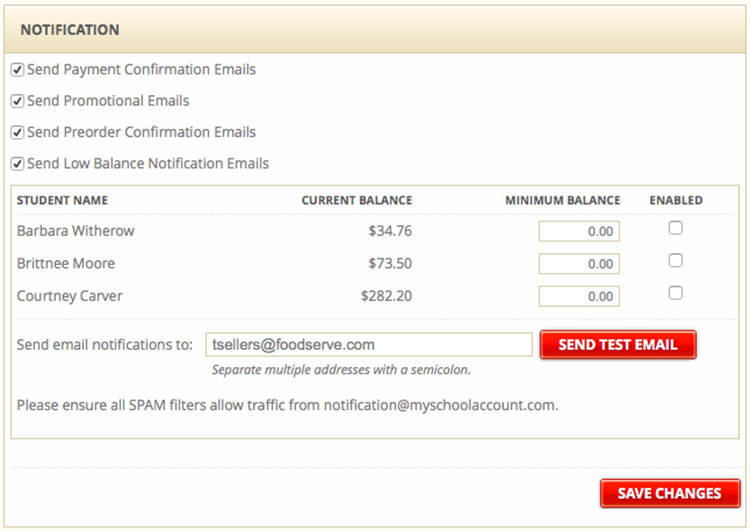
3 - Check the box marked Send Low Balance Notification Emails.
4 - Select which students you would like to receive notifications for by checking the Enabled box.
5 - Set the Minimum Balance threshold.
6 - Fill in the email address you want to have the alerts sent to.
7 - Click Save Changes.
-
We do not currently support multiple payer accounts linked to a single student account. We offer these guidelines:
Option 1 is to Share a single payer account.
Option 2 is to maintain two payer accounts, and add and remove the student from either account as necessary.
To Add a Student:
1 - From the Dashboard, click on Manage Students button.
2 - Click the Add Student button.
3 - Add the pertinent information for your student. You will need your student’s assigned Student ID# which can be attained from your students School/District and in some instances, date of birth.
4 - You can then choose to set your low balance notification alert minimum balance by adding a total and checking the Send low balance notification check box.
5 - Click ADD and your student will appear in your account when you go to the dashboard.
Repeat this process if you have multiple students
To Remove a Student:
1 - From the Dashboard, click on the Manage Students button.
2 - Select the student you wish to remove by checking the box in front of their name (see image below).
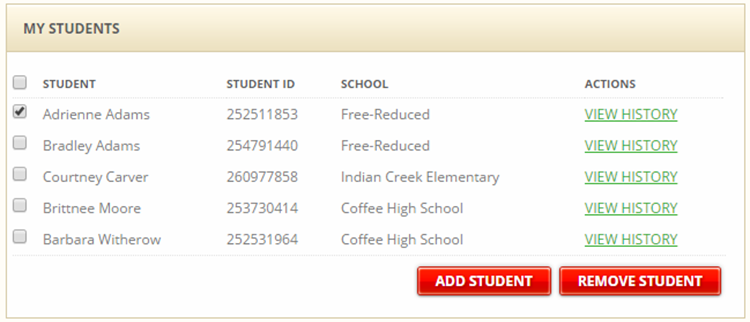
3 - Click the Remove Student button. You will then be prompted to confirm your action.
-
All questions concerning account balances and online transactions should be directed to your School/Districts food service department.
-
1 - From the Dashboard, click on the Deposit Funds button or find the Transfer Funds box (Shown below).
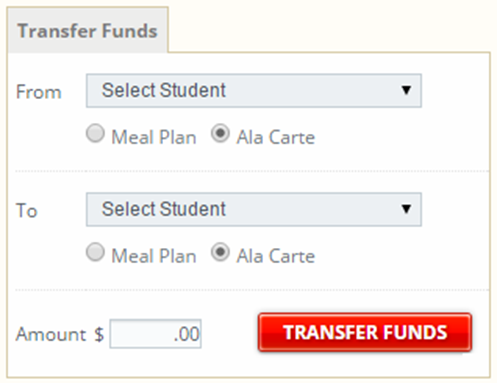
2 - Select the appropriate students according to whose account you want to have the money transferred between from the drop-down box.
3 - Type in the amount of money you want to have transferred.
4 - Click Transfer Funds, a confirmation will be displayed.
-
1 - From the Dashboard, click on the Deposit Funds button.
2 - Find the Online Payment History box at bottom of the page that displays your deposit history (shown below).
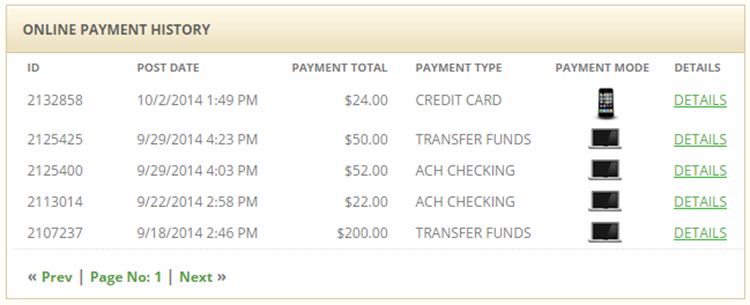
3 - Click the Details link to see specific information about each deposit.
-
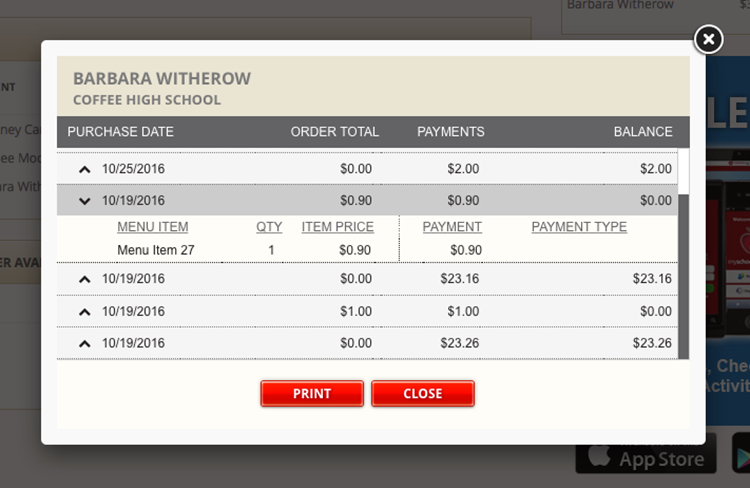
1 - From the Dashboard, find the My Students area (shown below).

2 - Click View History for the student who's purchases you would like to review. A pop up window will appear displaying student purchases (shown below).
-
Each school district or system administrator is responsible for maintaining their student accounts and all associated funds. All accounts are created, modified, and deactivated through the school’s database. Any changes to a student account are automatically transmitted to myschoolaccount.com.myschoolaccount.com only displays the information originating from the school’s database.


